Category Archives: Development
SP 2013: Getting started with the new Geolocation field in SharePoint 2013
Importing Search Configurations with SharePoint Apps
Rolling out SharePoint 2013 apps to the enterprise – tenant scope and PowerShell installs
Drag and Drop Navigation
- Go to the site where you are using the Managed Navigation
- Go to a page that has an item you would like to add to the global navigation
- In my example, I will add the “Documents” document library, so I went to the “Site Content” page
- You will see the “EDIT LINKS” link to the right of your global navigation, click the “EDIT LINKS” link (remember that you need to have full control on this site to see this link)
- You can add that item as a top level navigation item or as a child navigation item of an existing item
- Click the Save button
- Repeat steps 2-5 until you have added all the items you want in your navigation
- Items can be any draggable objects in your SharePoint sites, so this includes Apps (including lists and libraries) and items (this includes list items, documents, and even people)
- For my example, I now opened the Document library and added the “My Awesome Document” under the Documents navigation item


- Now if you go to the Term Store
- Site Actions > Site Settings
- Click Go to top level site settings [Site Collection Administration], if you are not on the root site collection
- Click Term store management [Site Administration]
- Click on a Term Group that you are using for your global navigation (my example in the screen shots below is called “Intranet”)

- As you can see, the navigation items that you have dragged and dropped are now terms under your global navigation Term Set. In addition, you will notice that any pinned terms to the source term that you added now also have pinned sub terms.
- Also notice that in the Term Store you can add more children terms under the navigation terms that were added. However anything beyond three levels will not show up in the global navigation, but can be used if you are intending to use this navigation Term Set for tagging content.
Configure a site’s Managed Navigation settings
- Go to the site where you would like to use Managed Navigation
- NOTE: if you would like to use Navigation inheritance for children sites, then make sure to perform the configuration on the top site which should have this navigation in your Site Collection (most likely your root site in the collection)
- NOTE: a navigation Term Set can only be configured once to a site, if you would like to reuse your Term Set for navigation on another peer site or another Site Collection, or even another Web Application, then you will need to create another Term Set and pin the first level terms (with children) to your existing Term Set. You can see this in the screen shot below on the Term Set “Supply Chain Navigation”.
- Go to the Navigation configuration screen in Site Settings
- Click Site Actions > Site Settings
- Click Navigation [Look and Feel]
- Click on the Managed Navigation option [Global Navigation section]
- Expand the Term Groups and select the Term Set that you would like to use for your site’s Navigation [Managed Navigation: Term Set section] or click the “Create Term Set” button to create a new Site Collection scoped Navigation Term Set

- Then click the OK button
- Go to your site and observe the Global Navigation

Create the Managed Navigation Term Set
- For single Site Collection Navigation scoped Term Sets, go to the CONFIGURE A SITE’S MANAGED NAVIGATION SETTINGS post
- NOTE: the advantages here over traditional SharePoint Navigation are minimal
- For Global Navigation scoped Term Sets, go to the Term Store
- In on premise Central Admin
- Click Application Management
- Click Manage Service Applications [Service Applications]
- Click Managed Metadata Service
- In Office 365
- Click Admin > SharePoint [SharePoint Admin Center (SPO Admin)]
- Click Term Store
- In Site Collection (on premise or Office 365):
- Click Site Actions > Site Settings
- Click Go to top level site settings [Site Collection Administration], if you are not on the root site collection
- Click Term store management [Site Administration]
- In on premise Central Admin
- Click on a Term Group that you are either a group manager or contributor on or create a new one (my example in the screen shots below is called “Intranet”)
- Create a new Term Set (my example in the screen shots below is called “Global Navigation”)
- Click on the “Intended Use” tab
- Check the “Use this Term Set for Site Navigation” option and click the Save button

- Create a new Term (my example in the screen shot below is called “Home”)
- Click on the “Navigation” tab
- Click the “Simple Link or Header” radio button [Navigation Node Type]
- Enter the URL to the a site you would like to use as a home/landing site and click the Save button
What you need to know about Managed Navigation
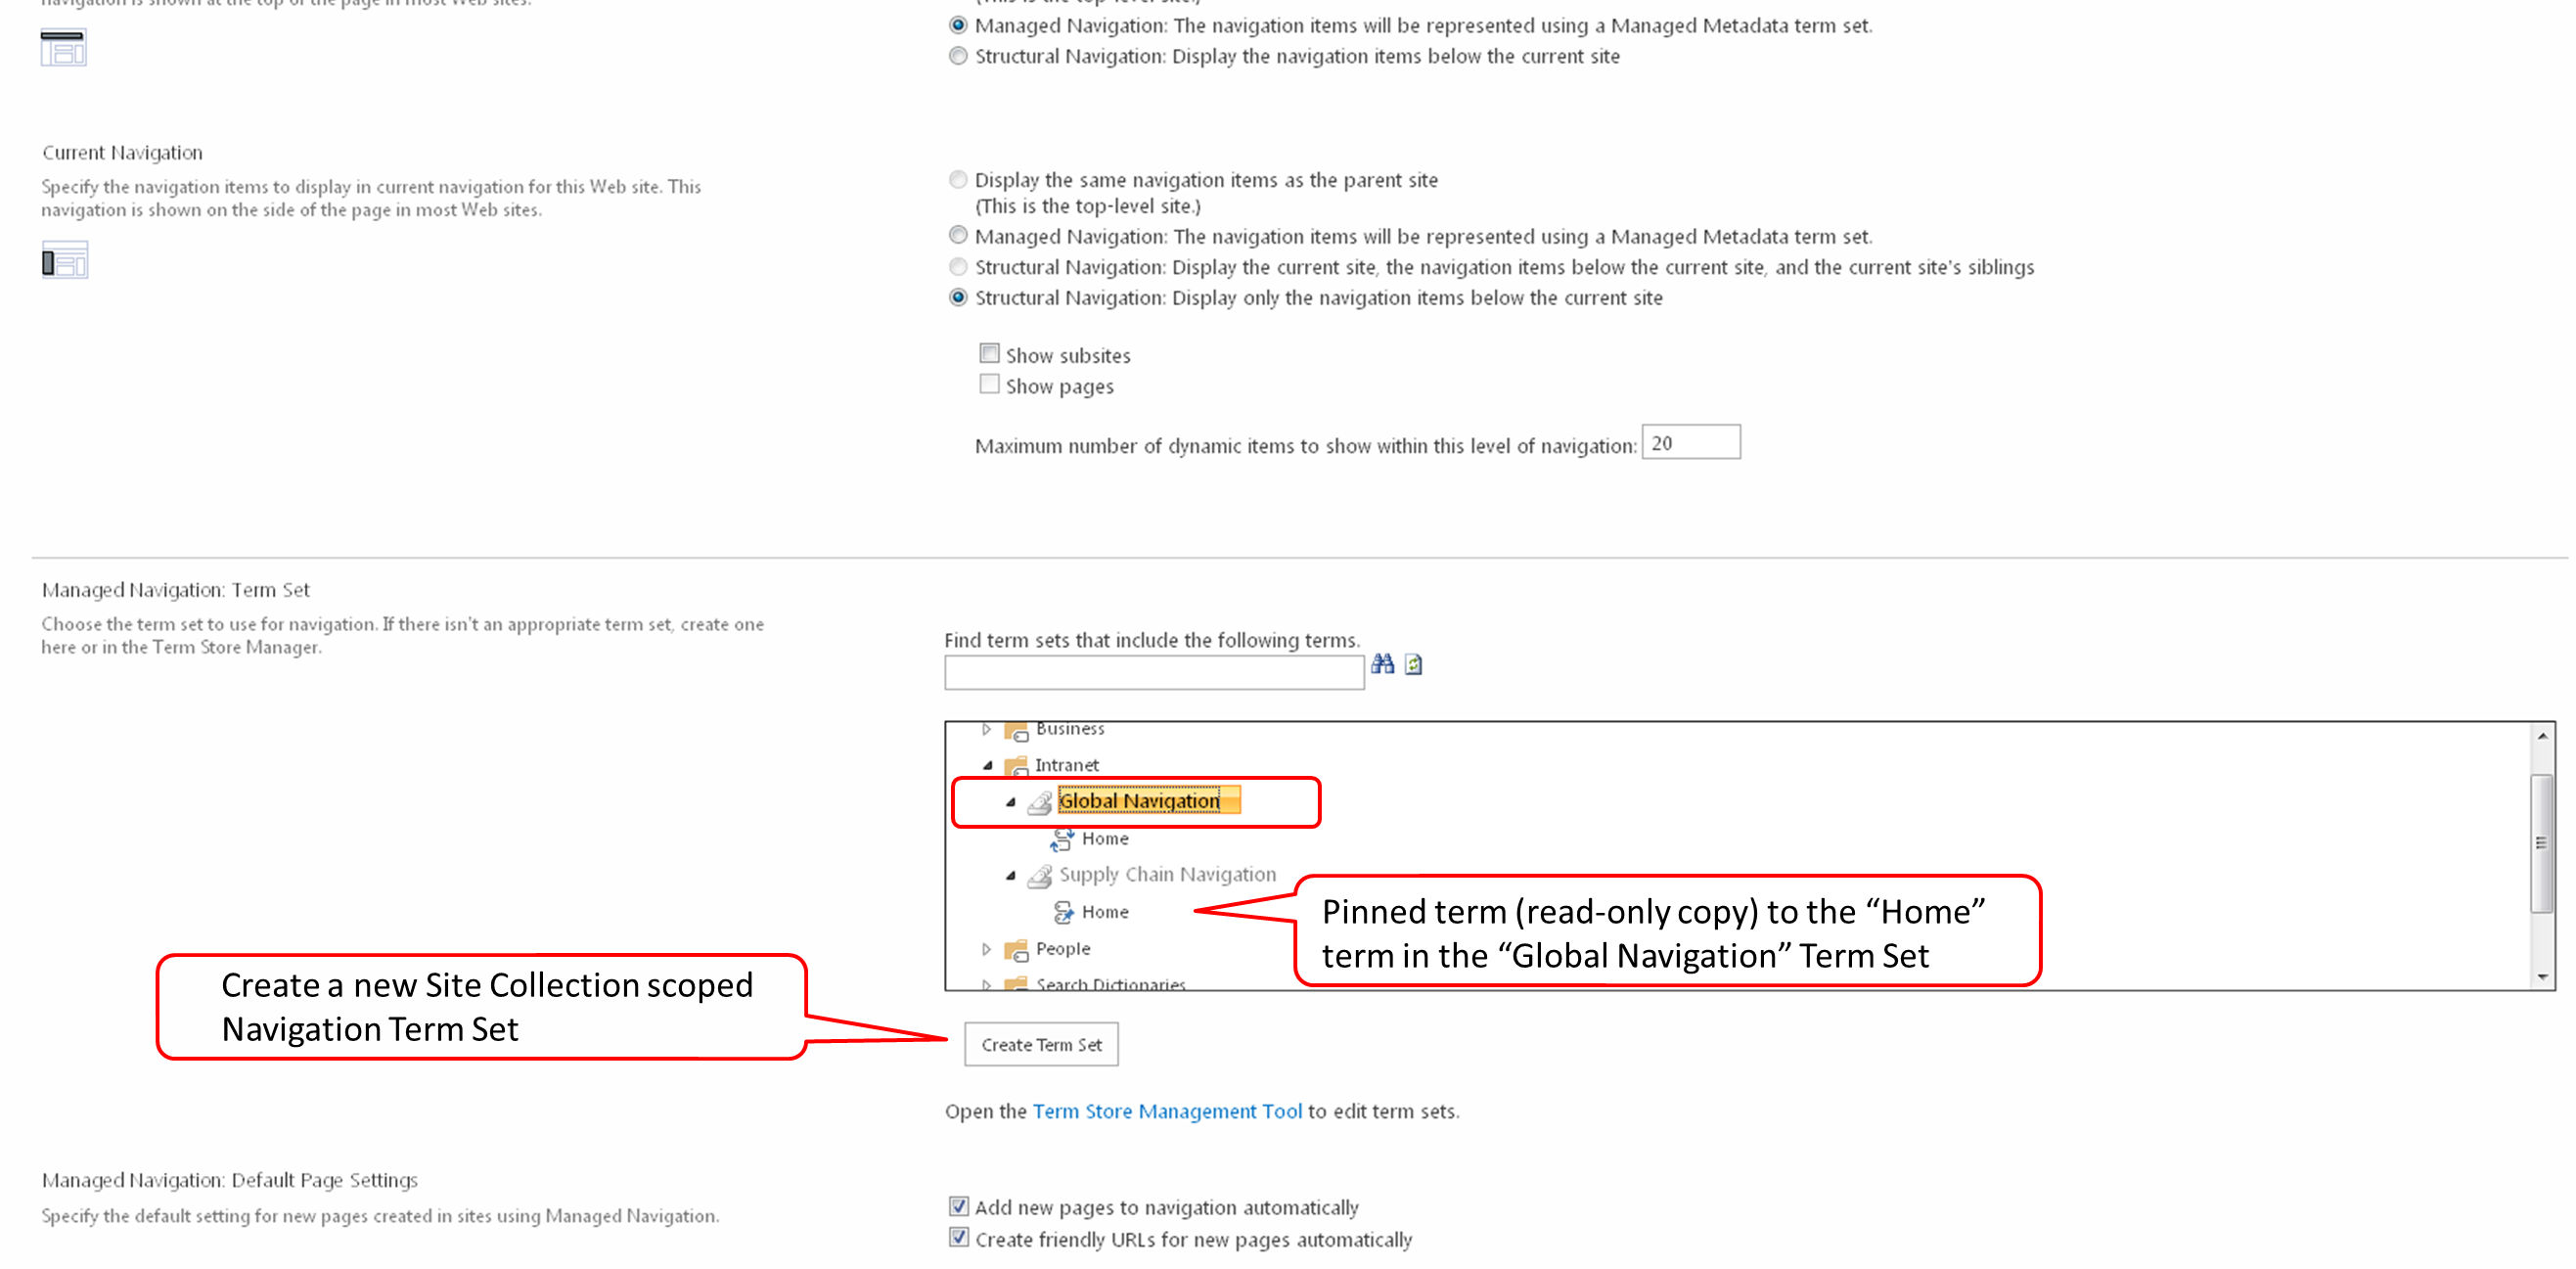
In 2013, if you go to Site Actions > Site Settings > Navigation (under the Look and Feel section), you will see the screenshot below. You need to have the “SharePoint Server Publishing Infrastructure” site collection feature activated to see the Navigation option. Any site that belongs to this site collection will now have the capability to use Managed Metadata based navigation, no matter which site template was used (you do not need to have a site created using the publishing site template or even have the “SharePoint Server Publishing” site feature turned on for this to be available.
You will notice the “Managed Navigation” option; this option is new in SharePoint 2013 and can provide you the following benefits.
- Allows you to create navigation menus with 3 tiers (the other options allow you no more than 2 tiers)
- A consistent navigation experience across sites, site collections, and even web applications (within a single tenant)
- Flexibility to make changes to menus across sites without duplication of effort for each site
- Ability to tag content and people with navigation items
- Friendly URLs
- Navigation item Pinning and Reusing
The only disadvantage to using the “Managed Navigation” option is that security trimming of the navigation items will no longer work. Managed Metadata Global Navigation is intended to provide a cross-site collection consistent navigation experience. Since each site collection is its own security perimeter, security trimming navigation items is not possible.
Metadata driven Navigation
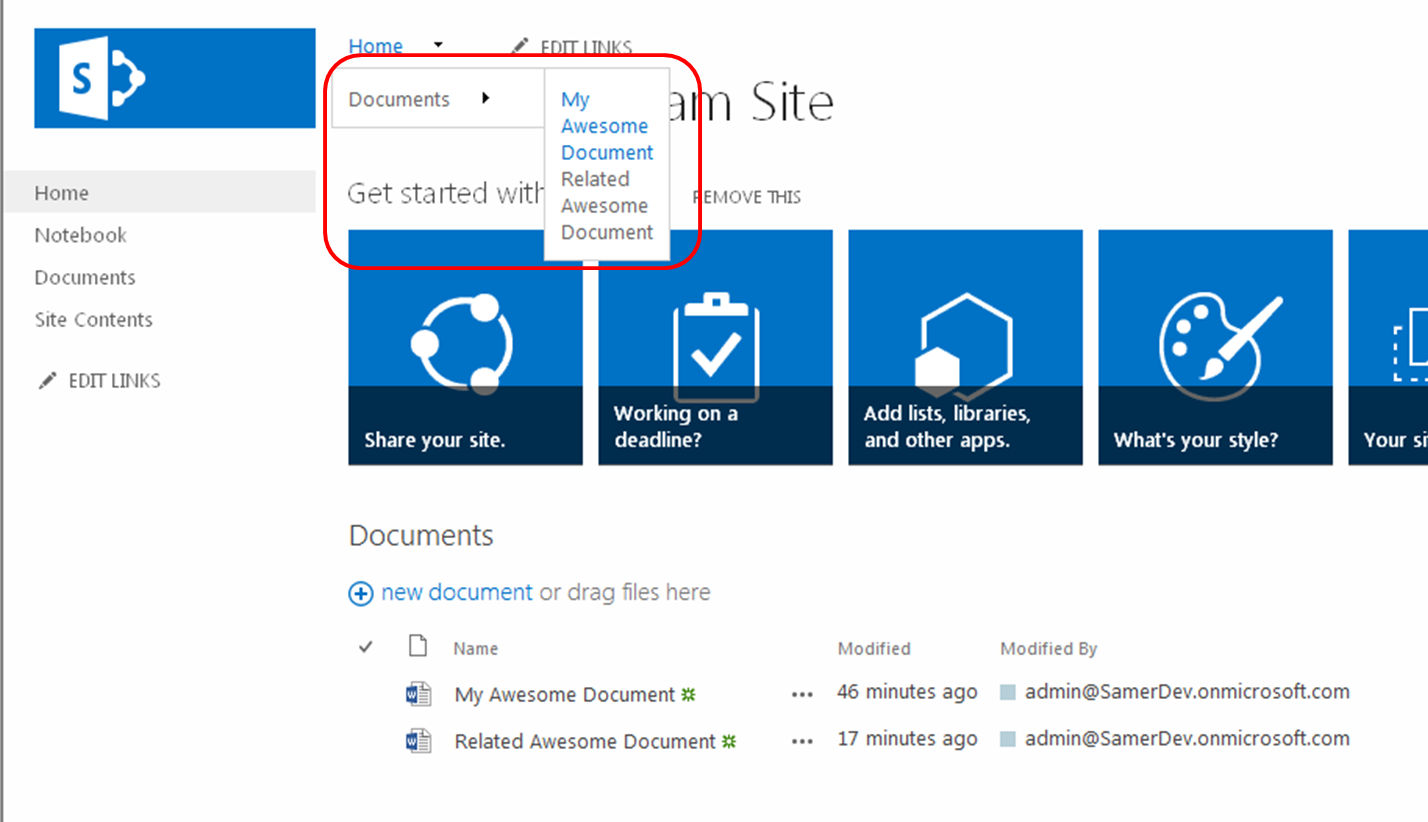
Recently I gave a presentation at SPS Philly on Managed Metadata & Metadata driven Navigation. The idea of this presentation was to show how easy it is to create a 3 tiered global navigation in SharePoint 2013. Afterwards I didn’t quite feel that the presentation was as simple and clear as I hoped it should have been (although attendees did come up to me at the end and thanked me, stating that the presentation was very beneficial to them). So I thought that I should cover this in a blog for anyone who didn’t quite see the simplicity of it. I started by explaining the changes to Managed Metadata from 2010 to 2013. I will leave this to a separate future post. In this blog, I will just show you how to create the 3 tiered global navigation. So here it is…
1. What you need to know about Managed Navigation
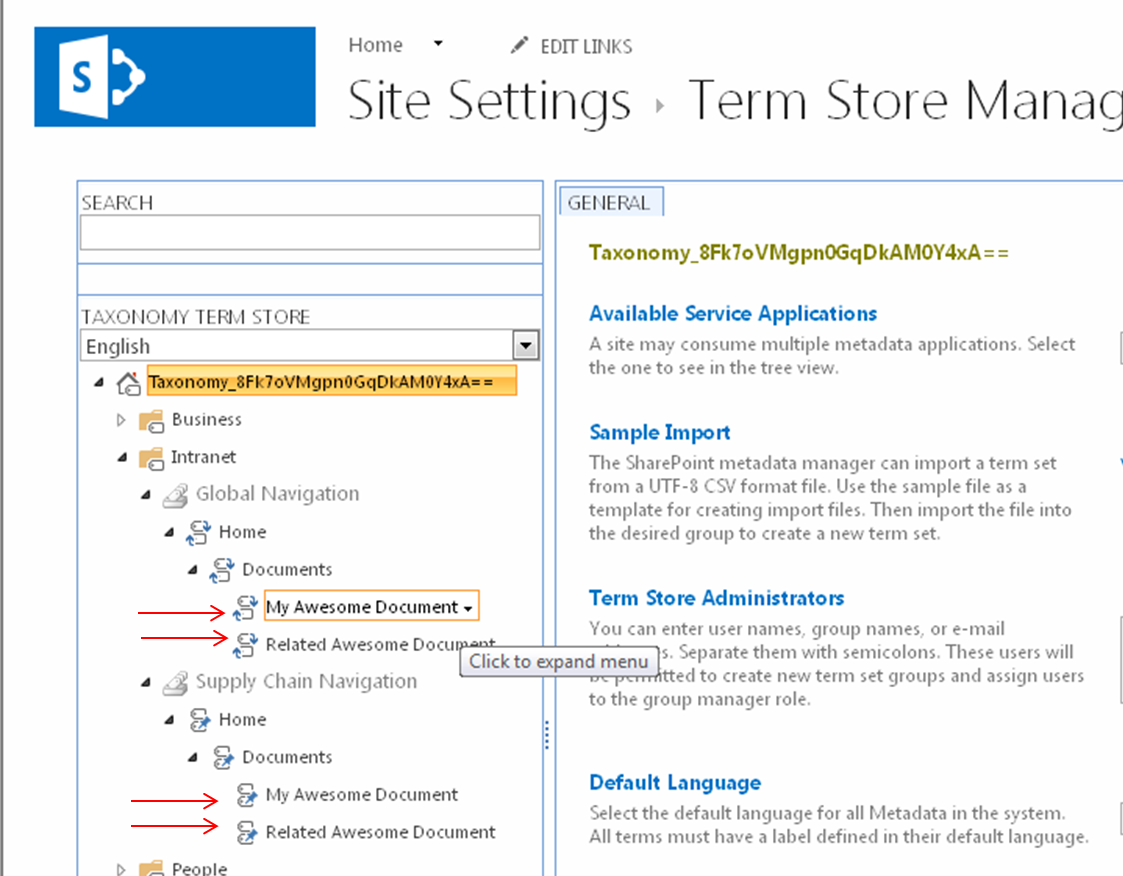
2. Create the Managed Navigation Term Set
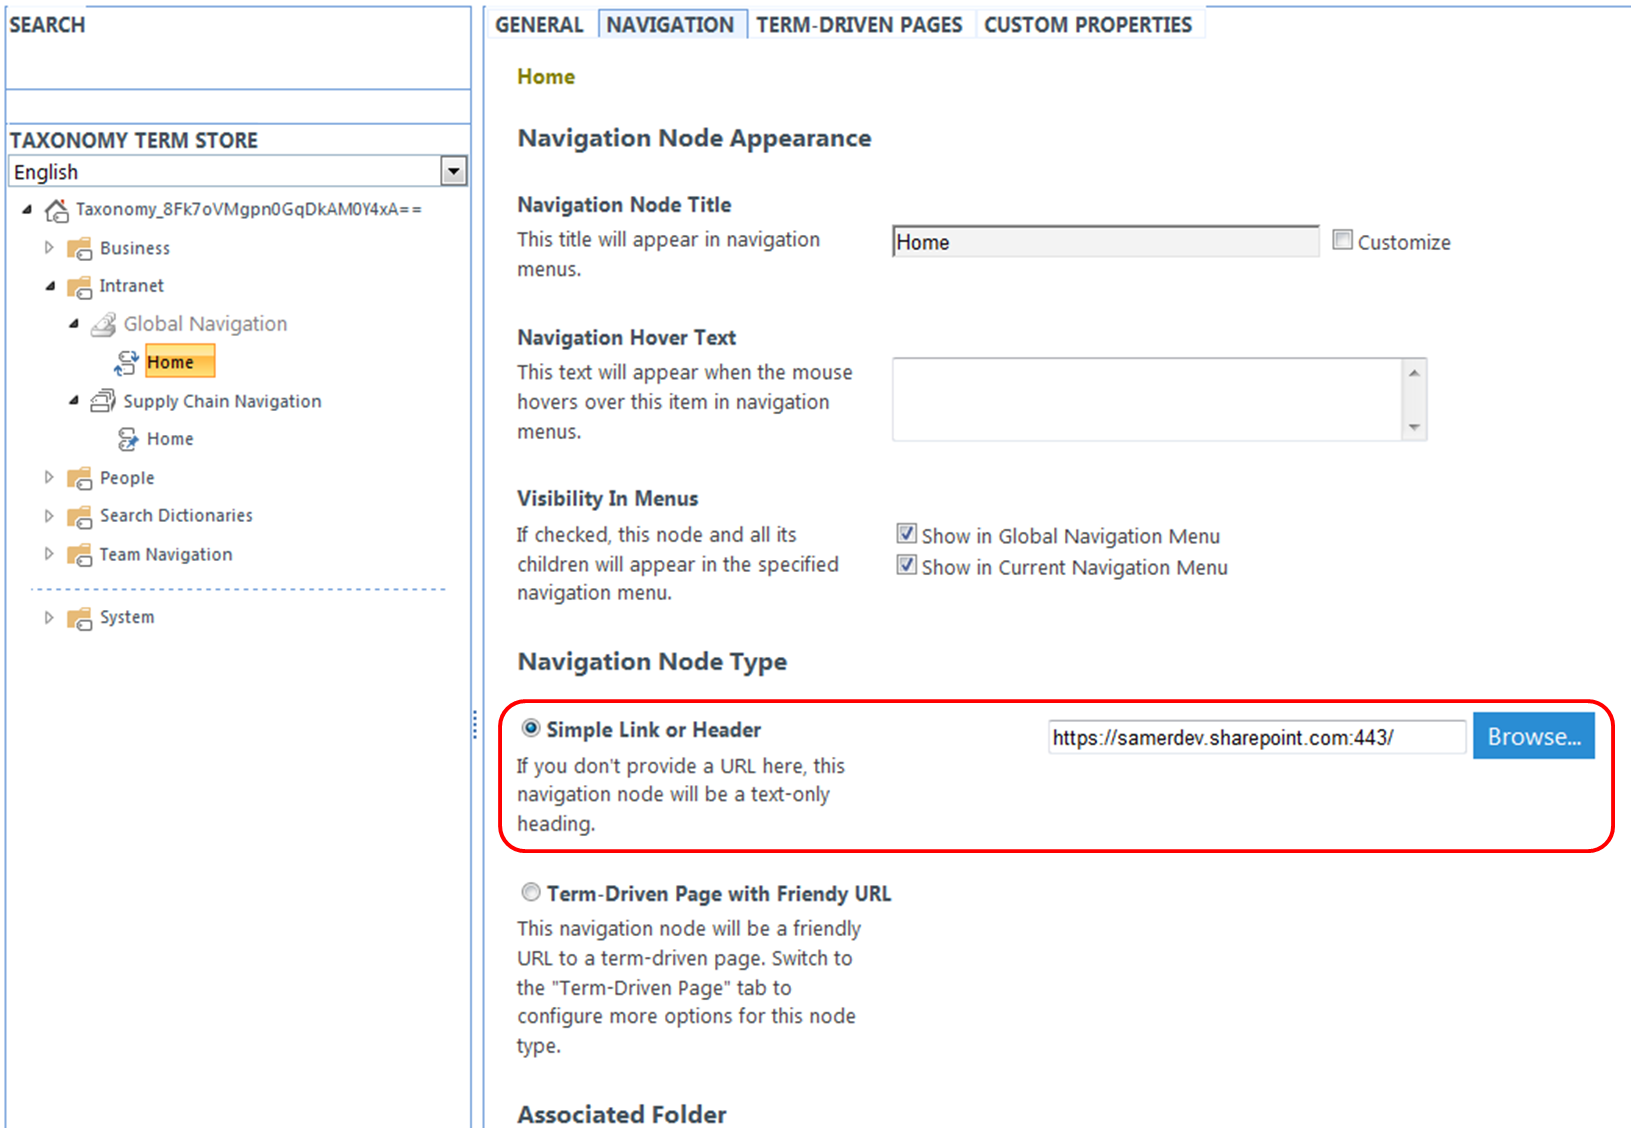
3. Configure a site’s Managed Navigation settings
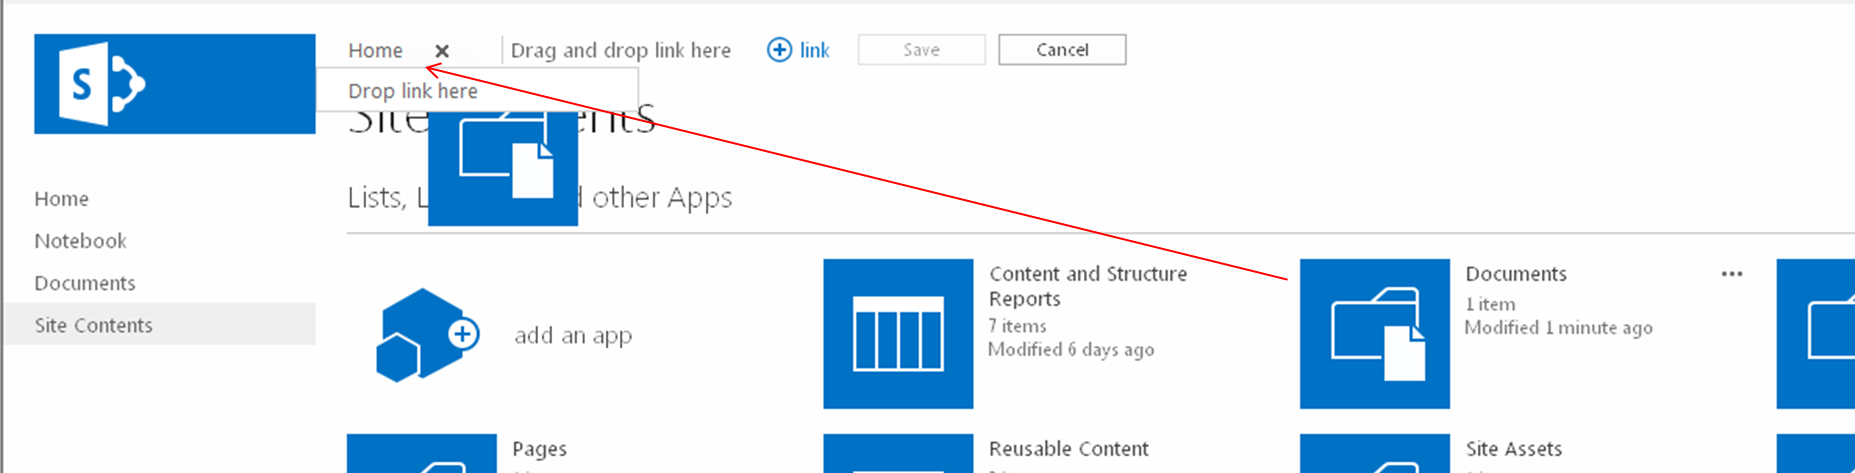
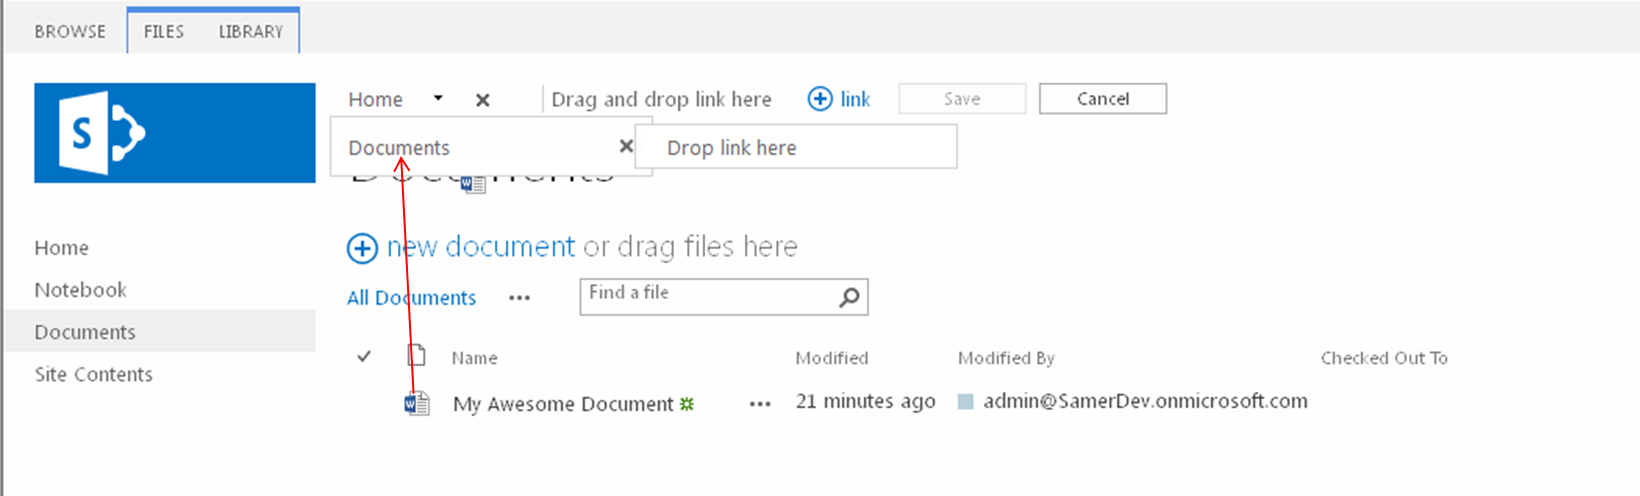
4. Drag and Drop Navigation settings
Now there are gotcha’s, as with most SharePoint related features. I have touched on some of these, but Nik Patel wrote a great post discussing these called Limitations of Managed Navigation in SharePoint 2013.
A BIT ABOUT SHAREPOINT SATURDAY
I have been to many SharePoint events and I am most impressed with SharePoint Saturdays [www.sharepointsaturday.org]. I’m impressed because consistently you find a very high level of presenters and content that is both topical and difficult to find else where (not to mention that it is free). It is no wonder that they fill up incredibly fast (New York filled within a day last year and Philly took a couple days once the announcement went out). SharePoint Saturdays occur once a year in major cities around the world. Checkout some of the SharePoint Saturday Philly presentations that you missed this year.
Implementing ECTs in SPD using Stored Procedures
If you plan to use Stored Procedures, you will need a separate stored procedure for each CRUD operation. In addition, you will need separate stored procedures for any associations you might need. It is important to note that each Read List, Read Item, and Association stored procedures need to return all the fields that will be required by any other stored procedure defined by that Content Type. In other words, the Read List, Read Item, and Association stored procedures need to return the same exact fields. If they don’t, you will get runtime errors.
Since most examples center on tables, you will often not see a detailed discussion of fields that are required for all the operations as tables always return to you all the fields of that table. So to avoid unintended runtime errors with your ECTs always make sure that your stored procedures return to you all the fields that you think you might need even if you expect not to need them in a particular ECT operation definition. SPD then allows you to define which of these fields should be included in the ECT definition.
The following is a list of field issues that you should be aware of:
- Unique Identifiers: Each stored procedure needs to provide a unique identifier of type integer. SPD will allow you to have other types of unique identifiers, but you will run into runtime errors if you try to perform any association, create, update, or delete operations. You need these identifiers to avoid issues even if they are completely meaningless to your solution.
- Limit filters (Read List operations): If it is possible that your data will return more than two thousand records, this will become big problem down the line. BCS by default has a 2000 item throttling limit. This limit can be changed, see BCS PowerShell: Introduction and Throttle Management. You can go without limit filters in development and not see any issue even if your database has hundreds of thousands of records as External lists will by default implement paging. Just understand that if you are using the object model (BCS Runtime or Client object models) to access your data, all records will be returned to you. This can be a major cause of performance degradation and you will not likely see it till you are on a production environment where there are greater latency issues (such as distributed servers, zones, and SSL implementations that you are likely not to have in development). One important thing to note is that a limit filter on its own will just limit the items returned; this means that without another filter type you can only access a subset of your data. For example if you want to limit the amount of books returned by a query to 100, you would add a limit filter and add another such as a Wildcard Filter (say for example a book’s partial title or publish date), this will mean you will get a maximum of 100 books which match the Wildcard filter returned. So in order to implement limit filtering on Read List operation, your Read List stored procedure needs to have an input parameter to use for performing an additional filter criteria.
- Nullable field types: SPD will give you warnings if it finds fields that are nullable, but it can handle them just fine. Be careful with this as External lists will try to return empty strings to these fields if the fields are not required. This can be a real problem if the field is not of a CHAR, VARCHAR, or some other string type. This will give you runtime errors. If you are using these fields via the object model (BCS Runtime or Client object models), then you can handle this by returning nulls for these field types.


